 Innocent.E
 I’ve broken enough things in my home lab on purpose to know that none of it means anything if I can’t get it back. So the next lab was deliberately boring by design: deploy Veeam Backup & Replication Community Edition against my real VMware environment, back up real VMs, and prove — not assume — that I could restore them. What started as a straightforward install-and-click-through exercise turned into two genuine infrastructure problems I had to work through rather than route around, and those turned out to be the most instructive part of the whole thing.
This post covers the entire arc: what Veeam actually is and what Community Edition gives you for free, how to install it end to end, how to point it at real storage, how to build and run a backup job, how to prove a restore actually works, and the real problems I hit along the way — a hard version-compatibility wall, a licensing gotcha that isn’t documented where you’d expect, and the quiet mechanics of backup chains, retention, and file types that only become obvious once you’ve watched them happen on a real system.
What Veeam Backup & Replication Actually Is
Veeam Backup & Replication (VBR) is backup software for virtual machines — it talks to your hypervisor (VMware, Hyper-V, or others), takes a snapshot-based copy of a VM’s disks, and writes that copy somewhere durable. It handles the whole lifecycle: scheduled backups, retention, restore, and replication, all from one console.
Community Edition is the free tier, and it’s not a crippled trial. It runs the exact same installer and console as the paid tiers — Standard, Enterprise, Enterprise Plus. The only things that change between tiers are which features unlock, controlled entirely by whether you have a license file. For a home lab, Community Edition’s limits are almost irrelevant:
- Up to 10 protected workloads (servers count as 3 instances each, workstations as 1 — a small lab barely dents this)
- No scale-out backup repository (SOBR) — fine, a home lab has one repository anyway
- Community forums only, no vendor support
- No time limit — free indefinitely, not a trial
The one thing to get right immediately: never install Veeam directly on a domain controller, vCenter Server, or anything else production-critical. Give it its own dedicated VM.
What You Need Before You Start
| Component | Minimum | Notes |
|---|---|---|
| Backup server OS | Windows Server 2019+ (64-bit) | Run it as its own VM on your VMware host |
| CPU | 2 vCPU | 4 vCPU is more comfortable if jobs run concurrently |
| RAM | 8 GB | Leave headroom on the host for everything else |
| Disk | ~10 GB for the app + SQL Express | Keep this separate from your backup repository volume |
| Database | SQL Server Express (bundled) | The installer offers to deploy this automatically |
| Permissions | Local Administrator | The account running the installer |
| Backup repository | SMB or NFS share | Needs more free space than the combined size of the VMs you’re protecting |
| Network | 1 GbE | Keep the Veeam VM and the repository on the same VLAN if you can |
Three network flows matter and are worth allow-listing explicitly if your network enforces strict inter-VLAN rules — this is the single most common reason “Add Server” or a first backup job fails in a segmented home lab:
- Management traffic: Veeam VM → VMware host/vCenter, over the vSphere API (TCP 443)
- Backup traffic: Veeam VM → repository, over SMB (TCP 445) or NFS (TCP/UDP 2049)
- Console traffic: your workstation → Veeam VM, TCP 9392
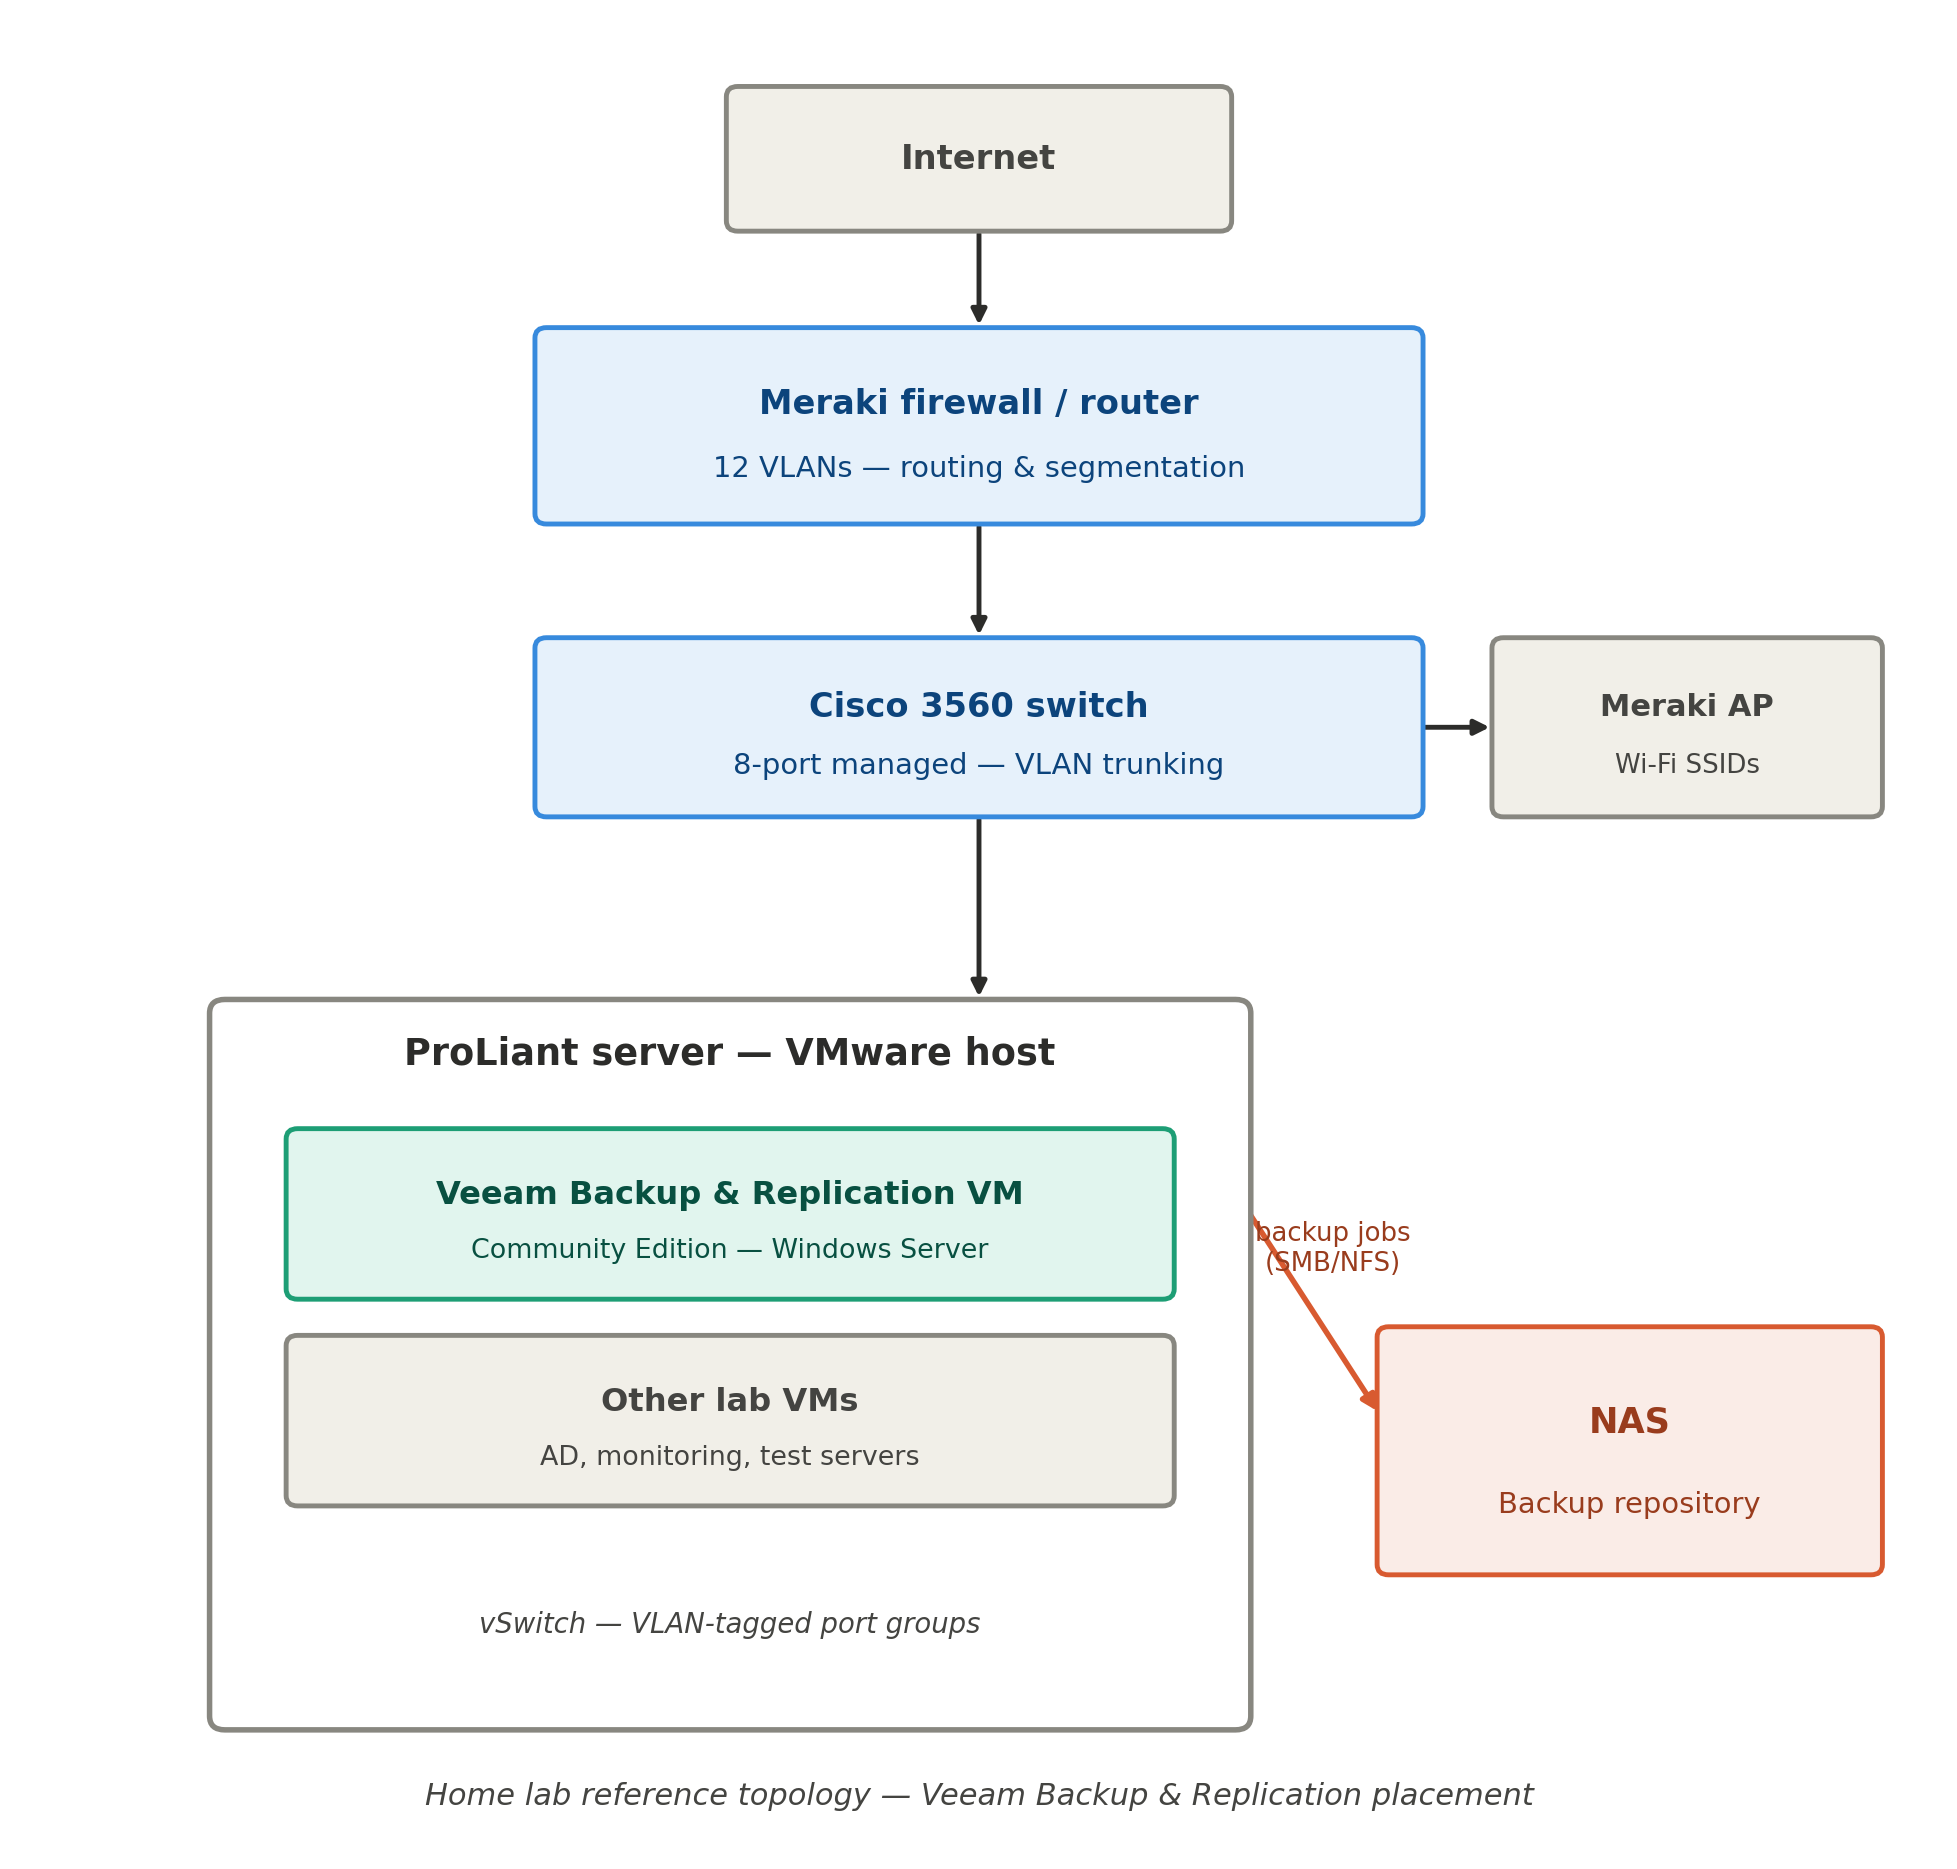
Where the Veeam Backup & Replication VM sits in the lab topology
Installing Veeam Backup & Replication
Veeam requires a free account to download the installer, even for Community Edition — go to veeam.com, register or sign in, and download the installation image (it’s a hefty ISO, budget for a ~12 GB download). Mount it to your Windows Server VM and run Setup.exe.
The install itself is a wizard, and the step that actually matters is easy to miss:
- Accept the license agreement.
- Skip the license key step. This is the entire trick — leave the license key field blank and click Next. Veeam automatically runs in Community Edition mode. No key, no registration, nothing else required. (If you later want the 30-day full-feature trial or have an NFR key, this is where you’d add it instead.)
- Let the wizard install prerequisites — .NET, SQL Server Express, the Windows ADK — automatically, skipping anything already present.
- Install. Budget 15–30 minutes on a lab VM, most of it spent on SQL Express.
Community Edition and the paid editions share one installer and one console. The license file is the only thing that changes what unlocks — you are never downloading a “lite” build.
One important trap I hit directly, worth knowing before you start: Veeam also ships a newer Software Appliance (VSA) — a hardened Linux appliance you deploy from its own ISO. I initially grabbed that expecting it to also support Community Edition. It doesn’t — VSA is Windows-installer-only for free licensing, confirmed on Veeam’s own FAQ. If you want Community Edition, you specifically want the classic Windows Setup.exe installer, not the appliance.
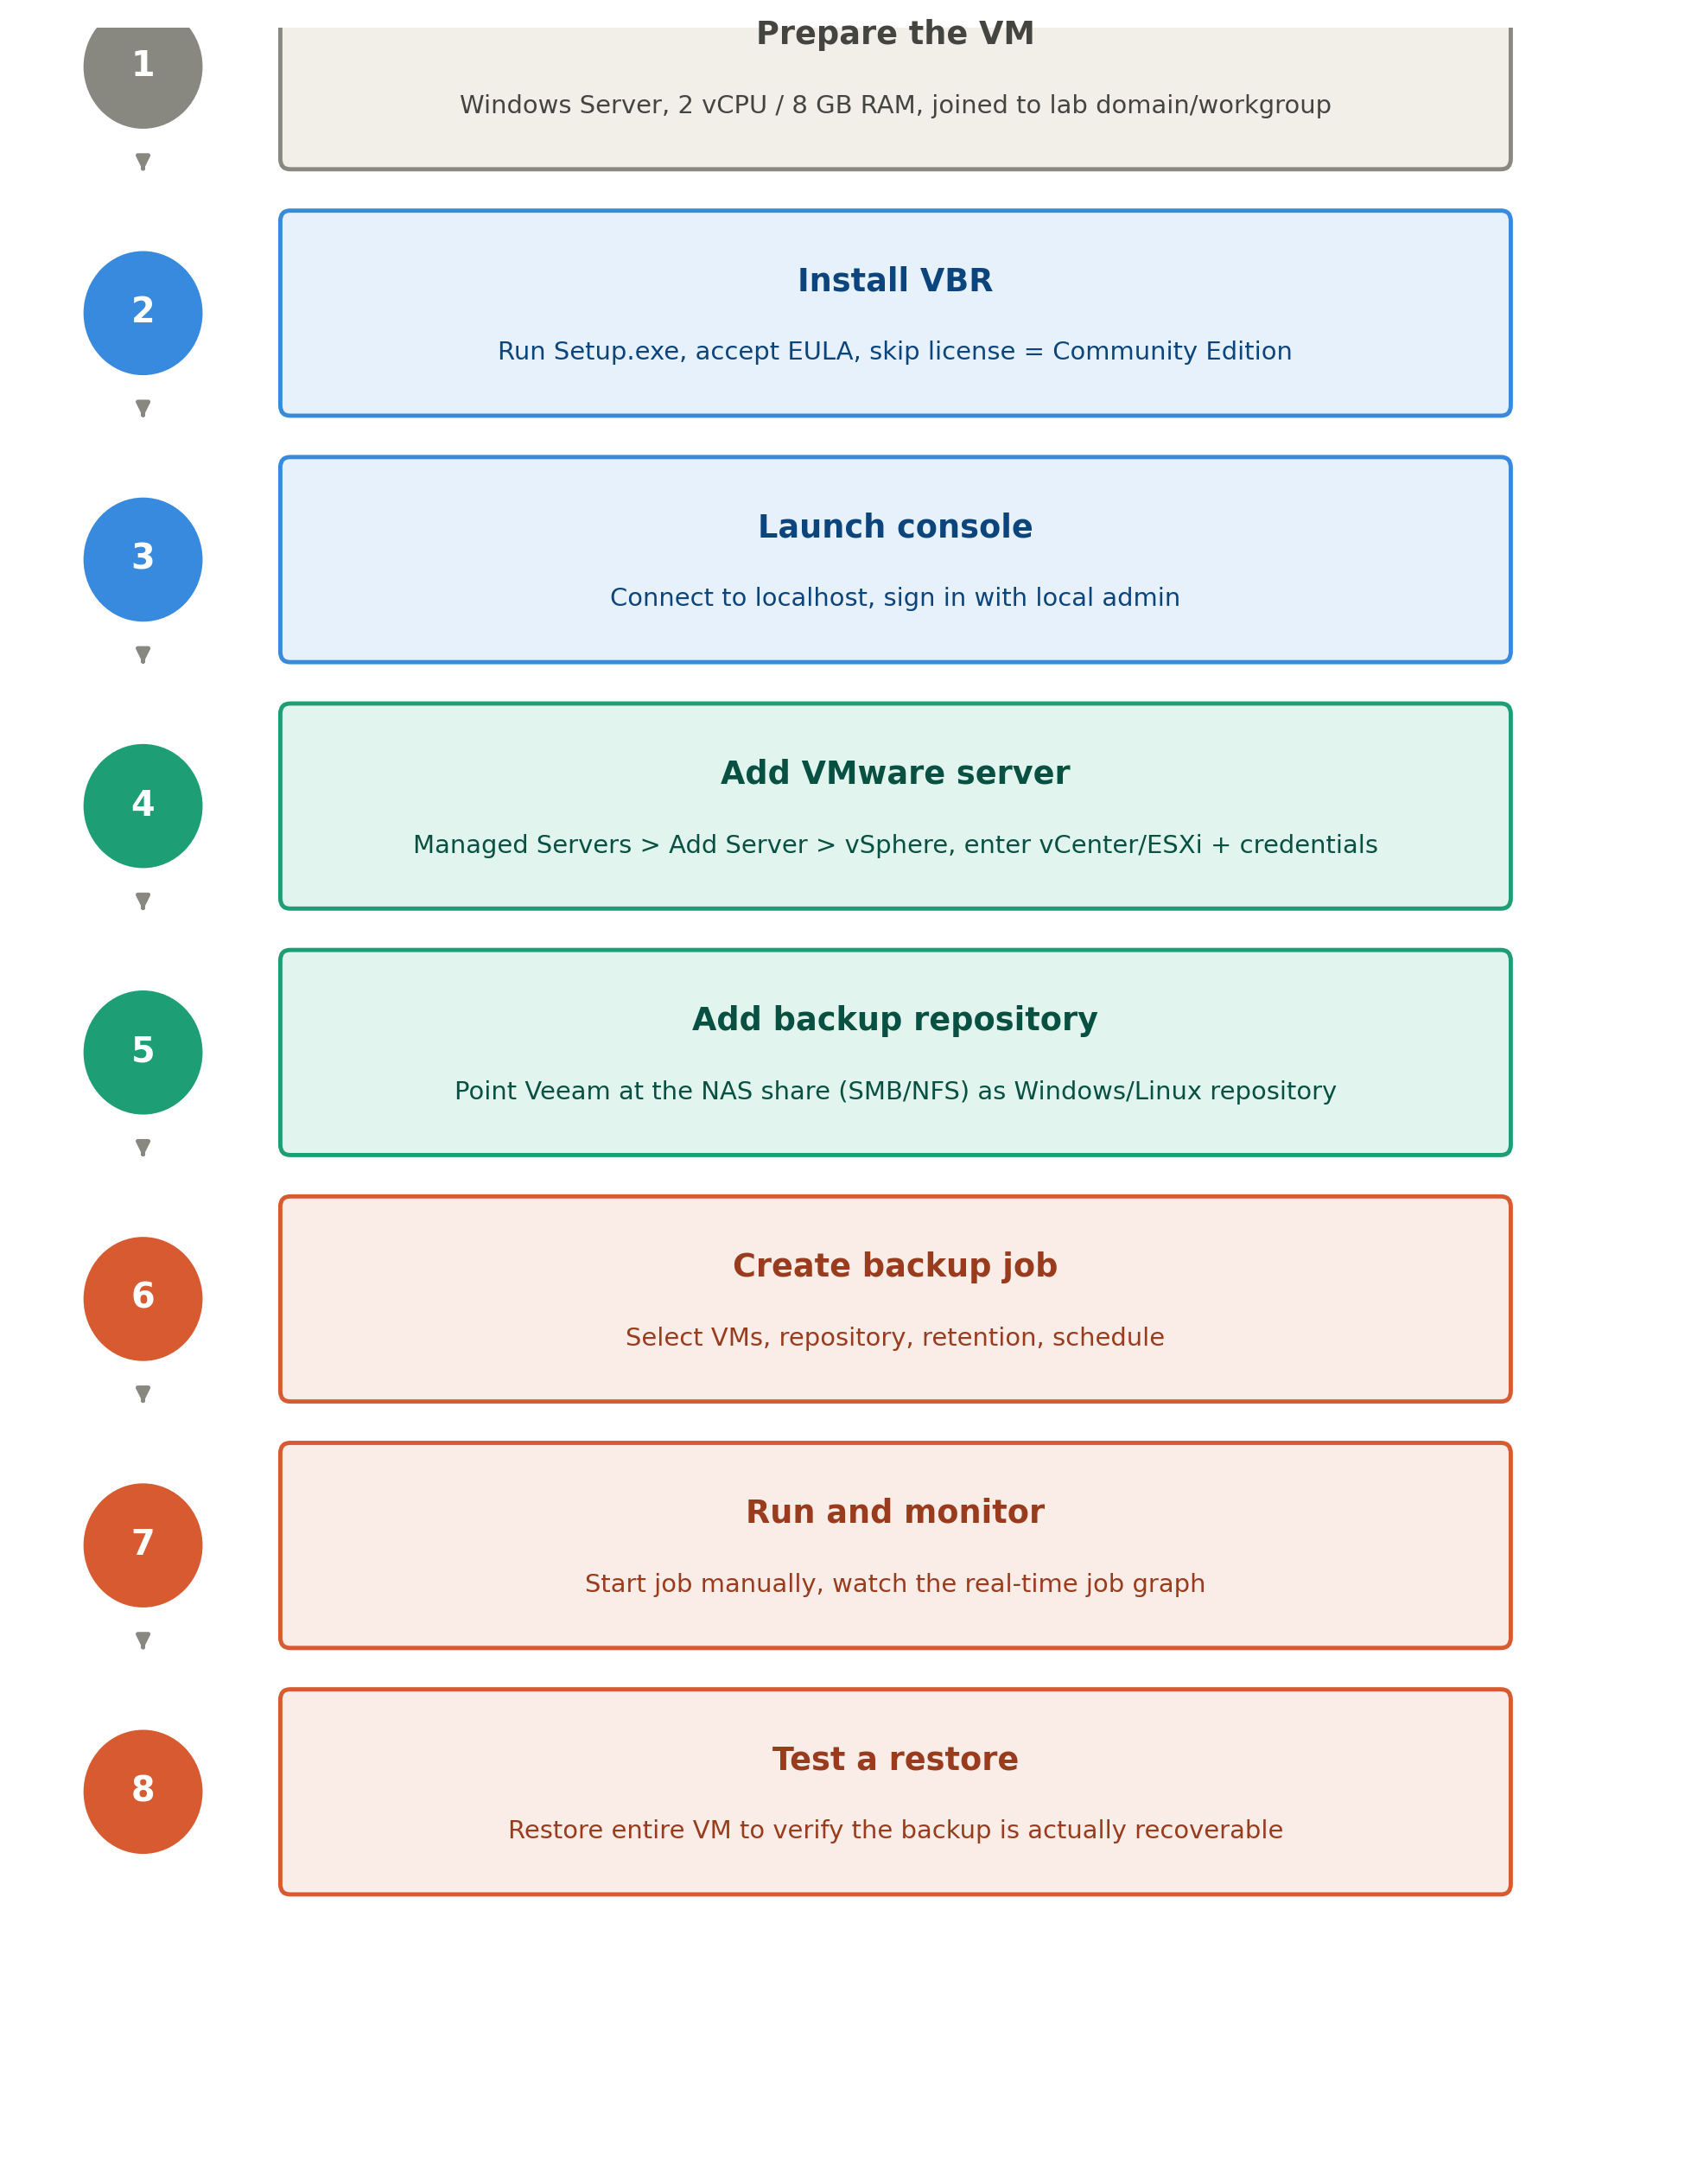
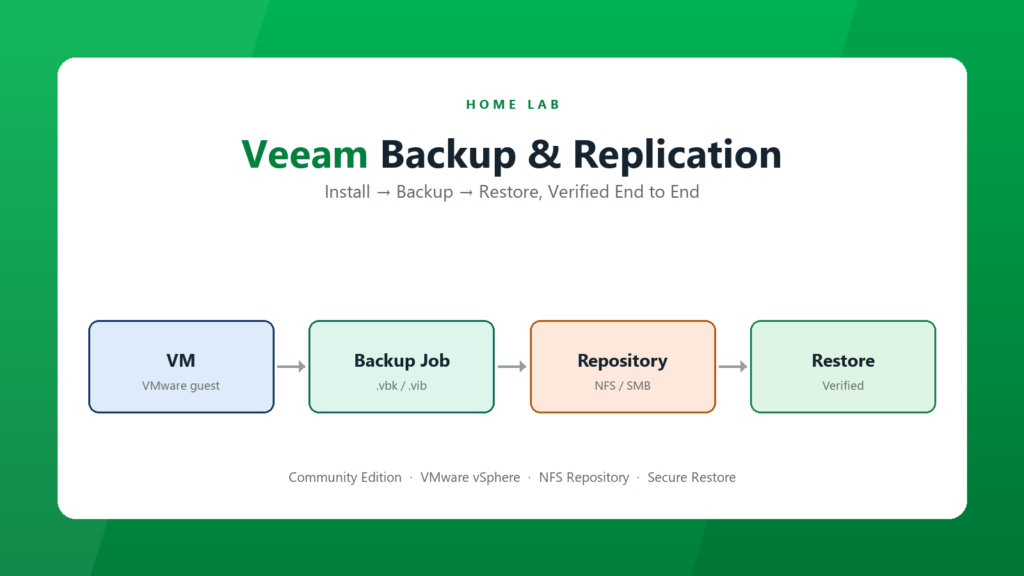
The eight stages covered in this guide
Launching the Console and Adding Your Infrastructure
The installer sets up both the Backup Server (the service doing the work) and the Console (the management UI) on the same VM by default — the simplest option for a lab. Open Veeam Backup & Replication Console from the Start menu, leave the server field as localhost, and sign in with the local Administrator account you installed with.
Add your VMware server. In Backup Infrastructure, right-click Managed Servers → Add Server → VMware vSphere. Enter the DNS name or IP of your vCenter Server (or standalone ESXi host if you don’t run vCenter), then credentials with administrator (or root) rights on that host. Veeam only needs enough access to browse inventory and take snapshots — a dedicated service account is good practice even in a lab, since it’s a habit worth building early rather than retrofitting later.
Add your backup repository. This is where the actual backup files live. Community Edition supports direct-attached, SMB, and NFS repositories — everything except scale-out repositories, which need Enterprise. Right-click Backup Repositories → Add Backup Repository, pick the type matching your storage, name it clearly (multiple repositories get confusing fast), and point it at your share.
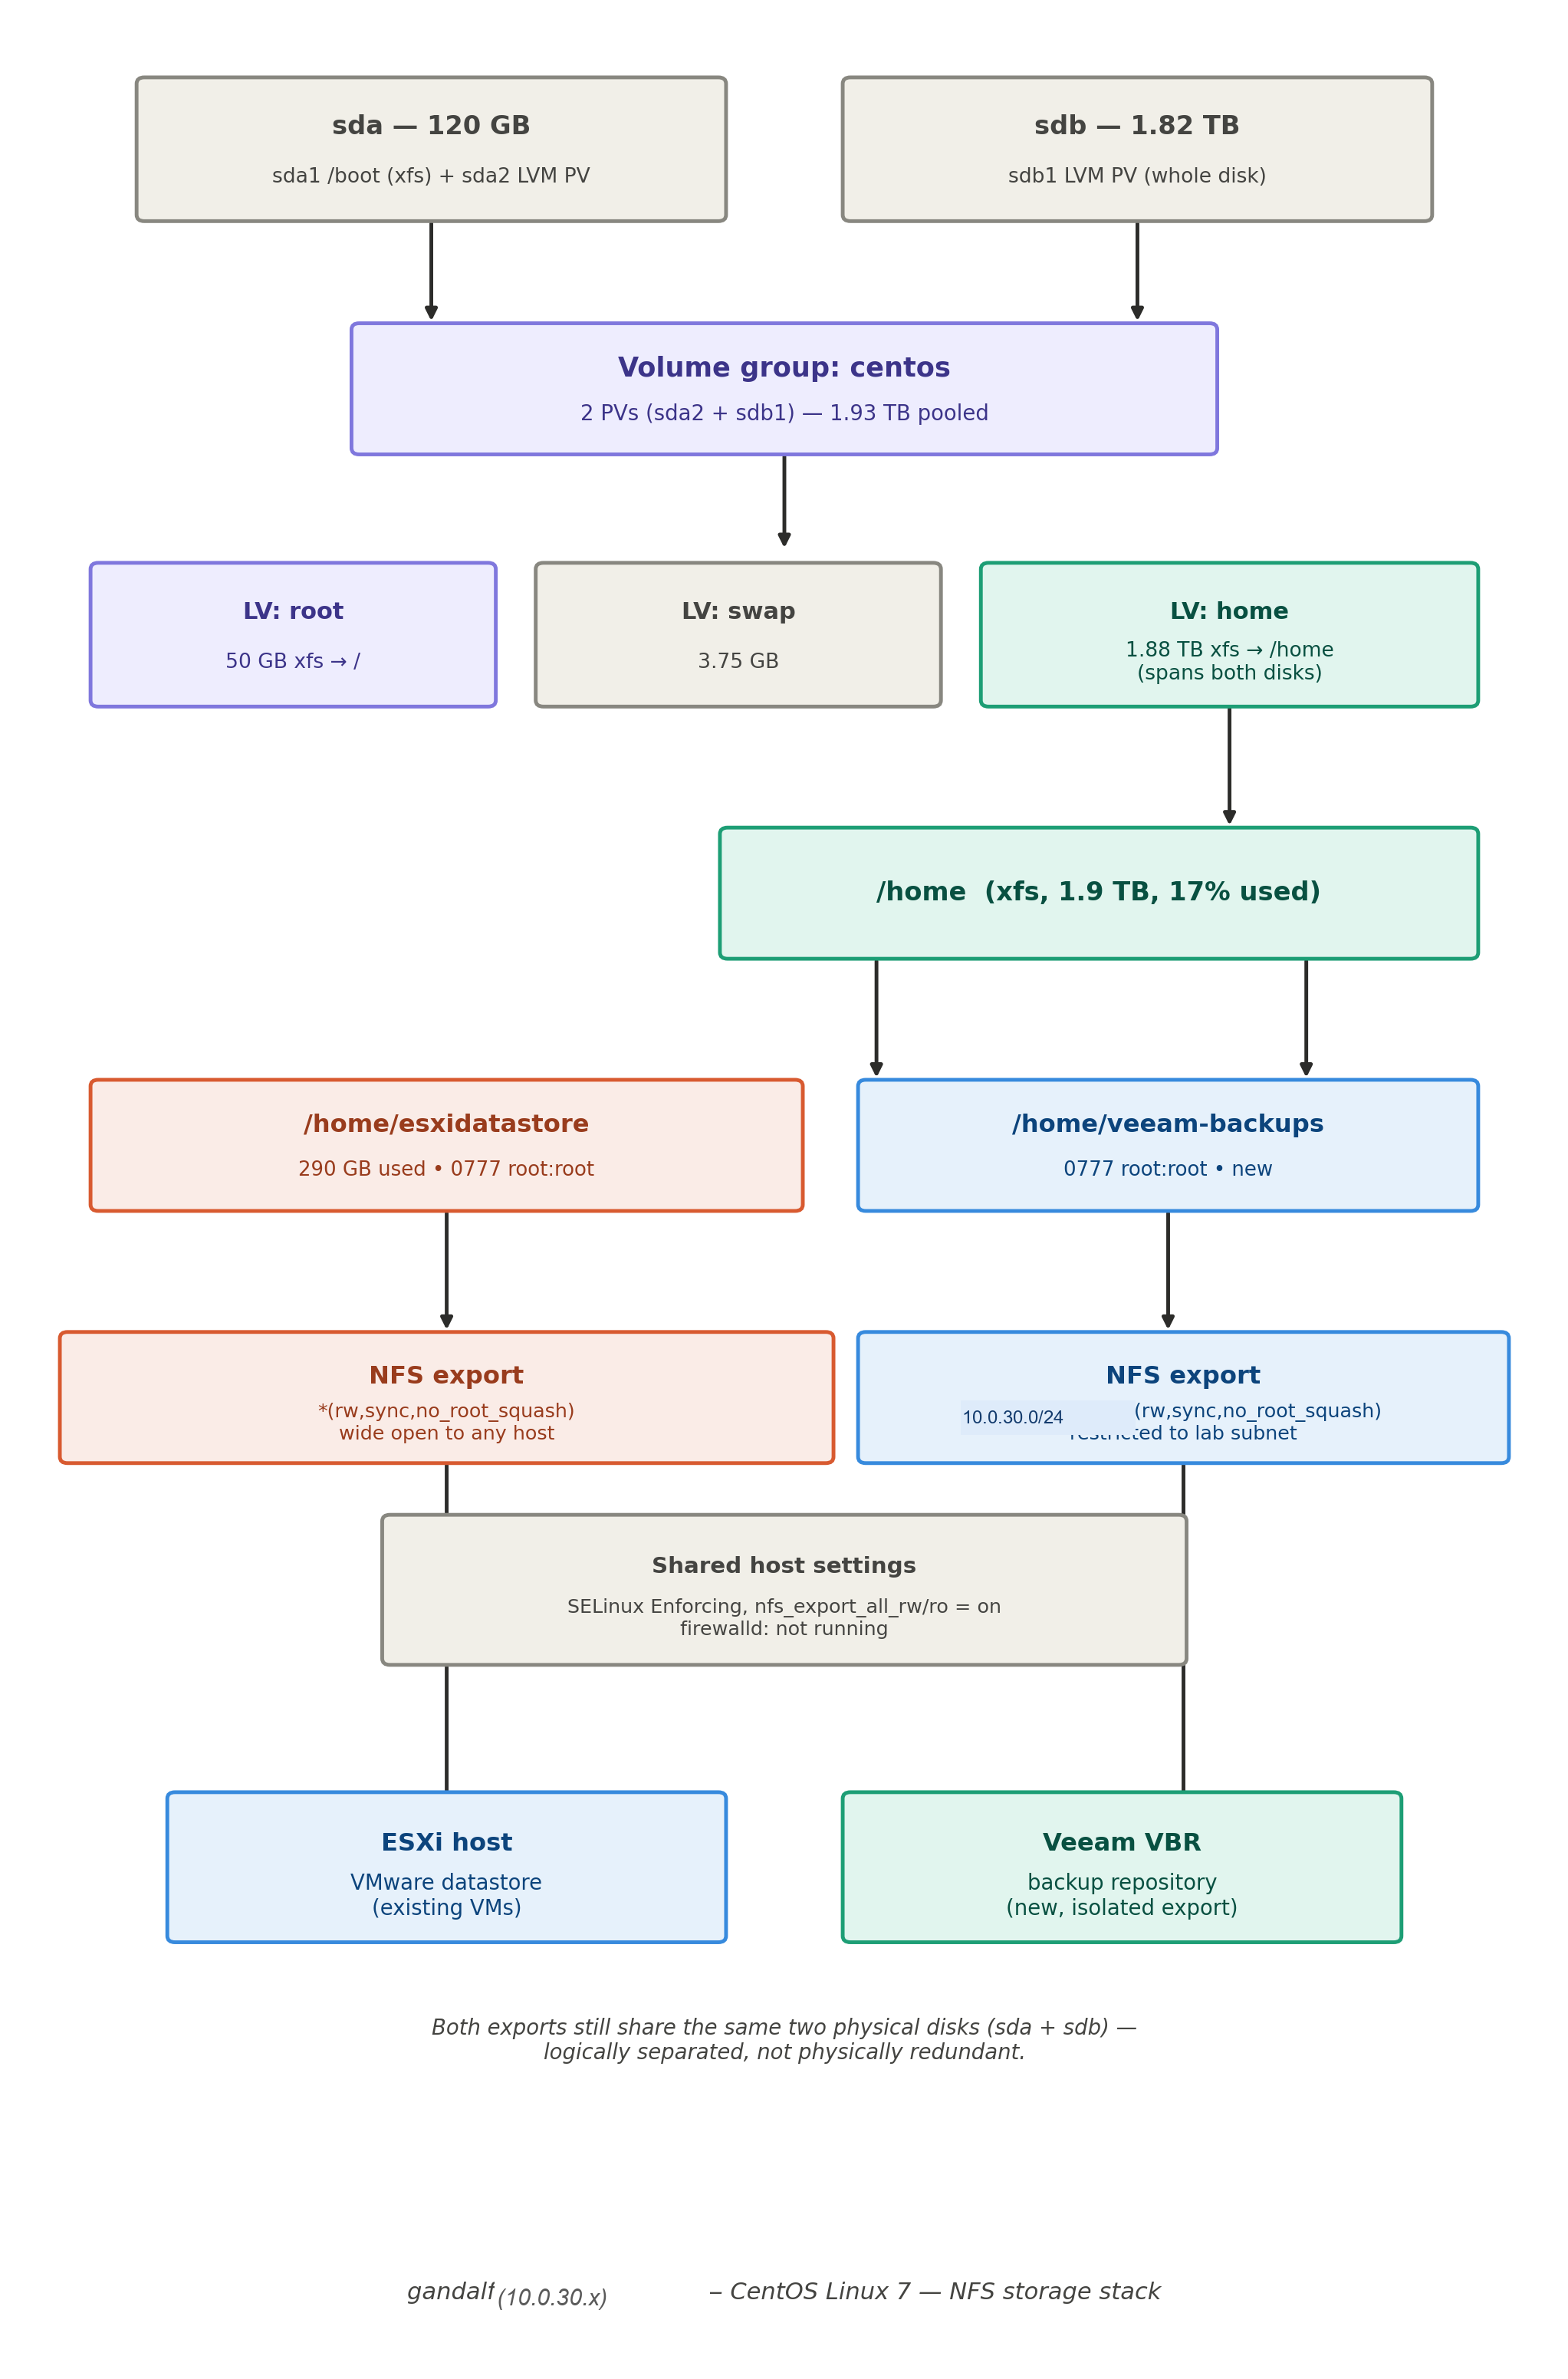
The NFS repository’s storage stack — two disks pooled by LVM, split into two purpose-specific exports
Designing the Repository Properly (Not Just Pointing at a Folder)
My repository is a self-built CentOS NFS server — not a commercial NAS, so there’s no admin GUI. Everything gets configured over SSH, which forced me to actually understand the storage stack rather than click through a wizard: two physical disks (a 120 GB boot disk and a 1.82 TB data disk) pooled by LVM into one volume group, with a dedicated logical volume mounted at /home.
The decision that mattered most here wasn’t technical, it was architectural: the box already had one NFS export in active use as a live VMware datastore. Reusing that same export as the Veeam repository would have put backups on the exact same volume as the VMs they protect — a single disk failure would take out the source and every backup of it simultaneously. I created a second, dedicated export instead, restricted to the lab subnet rather than left wide open like the original:
# Create the directory on the pooled filesystem
mkdir -p /home/veeam-backups
chown root:root /home/veeam-backups
chmod 777 /home/veeam-backups

# Export it, restricted to the lab subnet
echo '/home/veeam-backups 10.0.30.0/24(rw,sync,no_root_squash)' >> /etc/exports
exportfs -ra
exportfs -v

# Verified from another machine on the LAN
showmount -e 10.0.30.x
Two details that will bite you if you skip them:
no_root_squashis required. Both ESXi and Veeam’s mount server operate as root over NFS — without this option, writes fail with permission errors even when the Linux-side permissions look completely fine.- SELinux, in Enforcing mode, blocks NFS from exporting an ordinary home-directory-labeled folder by default. The
nfs_export_all_rw/nfs_export_all_robooleans have to be explicitly turned on:
setsebool -P nfs_export_all_rw on
setsebool -P nfs_export_all_ro on
Worth being honest about the limits of this design: both exports still sit on the same two physical disks. The separation here is logical, not physical — a real disk failure still takes out both. True isolation needs a genuinely separate drive.
Creating and Running Your First Backup Job
With a VMware server and a repository in place, the actual job is quick to configure. Pick a small, low-value VM for the first run so a mistake costs nothing.
- Home view → right-click Jobs → Backup → Virtual Machine → VMware vSphere.
- Give it a descriptive name.
- Add the VM(s) to protect. Selecting a whole folder or resource pool auto-includes new VMs added later.
- Pick your repository and a retention policy — 7 restore points is a sensible starting point for a lab.
- Leave Guest Processing at its defaults for a first pass (this controls application-aware processing — VSS, transaction log truncation — worth revisiting once you back up something like a domain controller or SQL VM).
- Set a schedule, make sure “Retry failed VM processing” is checked.
- Check “Run the job when I click Finish” and finish. The job kicks off immediately.
While it runs, double-click the job to open the real-time job graph — you’ll watch the actual phases (getting VM info, creating snapshot, copying data blocks, removing snapshot) with a live throughput graph. This is the fastest way to understand what a backup job is actually doing under the hood, and it’s the same monitoring UI at every license tier. Green means success, yellow means it finished but wants attention, red means check the statistics log.
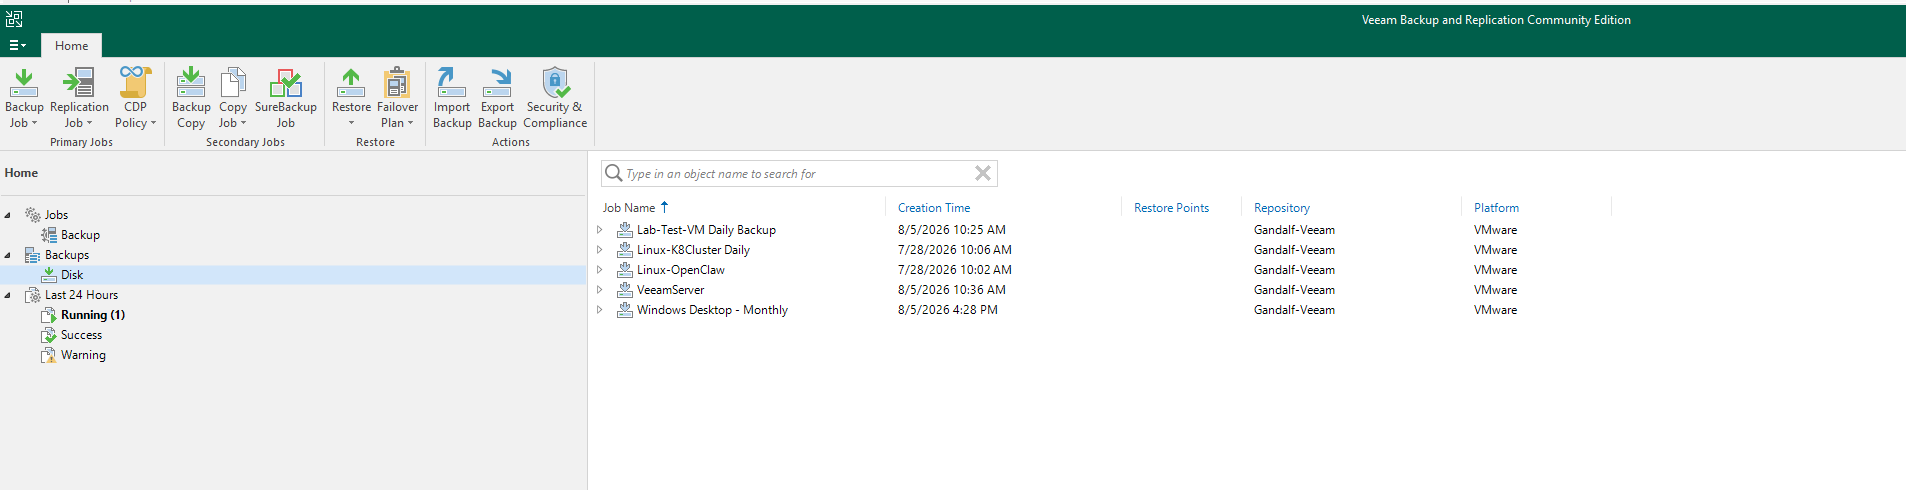
The five live jobs, as seen in the Veeam Backup & Replication console
Understanding the Backup Files
This is the part that stays abstract until you actually look at a job’s folder on disk. Here’s what’s really sitting on the repository:
| File type | Contents | Observed size |
|---|---|---|
.vbk |
Full backup — a complete, self-contained copy of the VM | ~52 GB for a first full backup |
.vib |
Incremental — only the data blocks changed since the previous backup | ~3.4–3.6 GB per day |
.vbm |
Metadata — the index tying the whole chain together, read by the console | ~23 KB |
Do not rename or move these files by hand from outside Veeam. The console is the only safe place to manage them — more on why in a moment.

A real job’s folder on the repository — one .vbk, incremental .vib files, one .vbm
Watching a real chain grow over about a week (one of my jobs hit 68 GB across a handful of days) taught me the actual mechanics: a forward-incremental chain never shrinks on its own. It only stays bounded because retention actively merges the oldest restore point forward into the chain every night — and that merge is real, recurring I/O work on the repository, not a free background task.
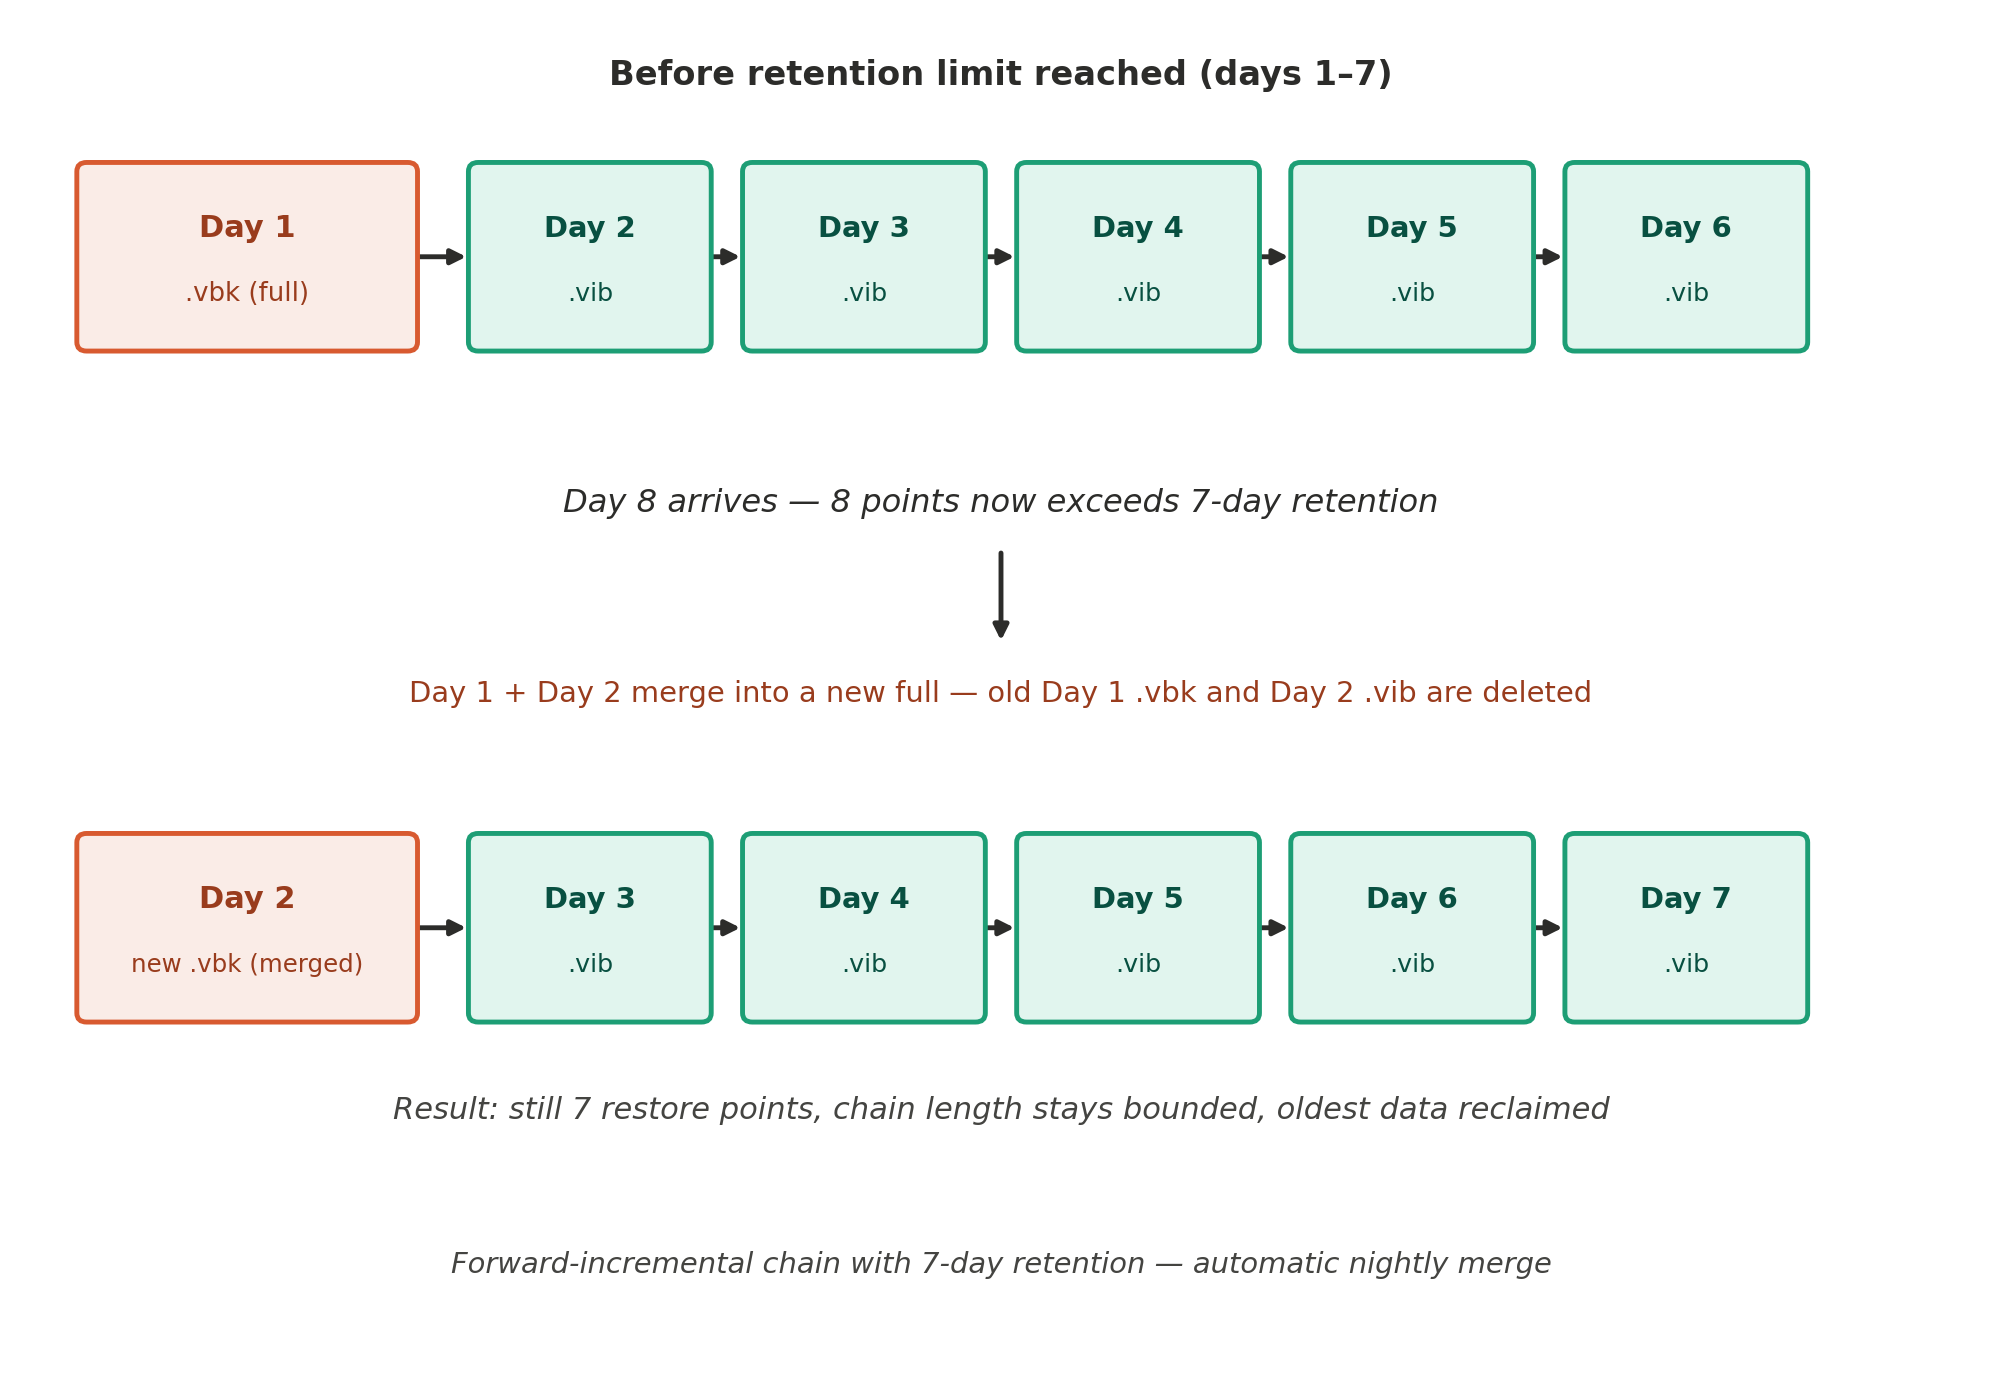
Forward-incremental chain with 7-day retention: the automatic nightly merge that keeps chain length bounded
Retention, and Why Periodic Full Backups Matter
Without a periodic full configured, every restore has to replay the entire chain from the original .vbk forward. Restore time grows with chain length, and a single corrupted file anywhere in that chain breaks every restore point after it. Two mechanisms fix this, both under a job’s Storage → Advanced → Backup tab:
- Active full — re-reads the entire VM from the source: full VMware snapshot, full network transfer, full write to the repository. Same cost as the very first backup, but immune to any existing corruption in the chain since it starts completely fresh.
- Synthetic full — built entirely from files already on the repository. No read from the source VM, no network transfer, much cheaper — but only as trustworthy as the chain it’s built from. A hidden corruption in an existing
.vibcarries forward into the new “full.”
I saw this directly in one job’s restore point list: a Full landed partway through an otherwise-daily-increment chain, which is exactly this mechanism in action — every restore point from that day forward only has to replay back to that new full, not all the way to the original.
Restore Operations — Four Options, Two Real Tradeoffs
There are four ways to get data back, and they split cleanly along two axes: how fast you’re back online, and whether you get a full VM or just disks.
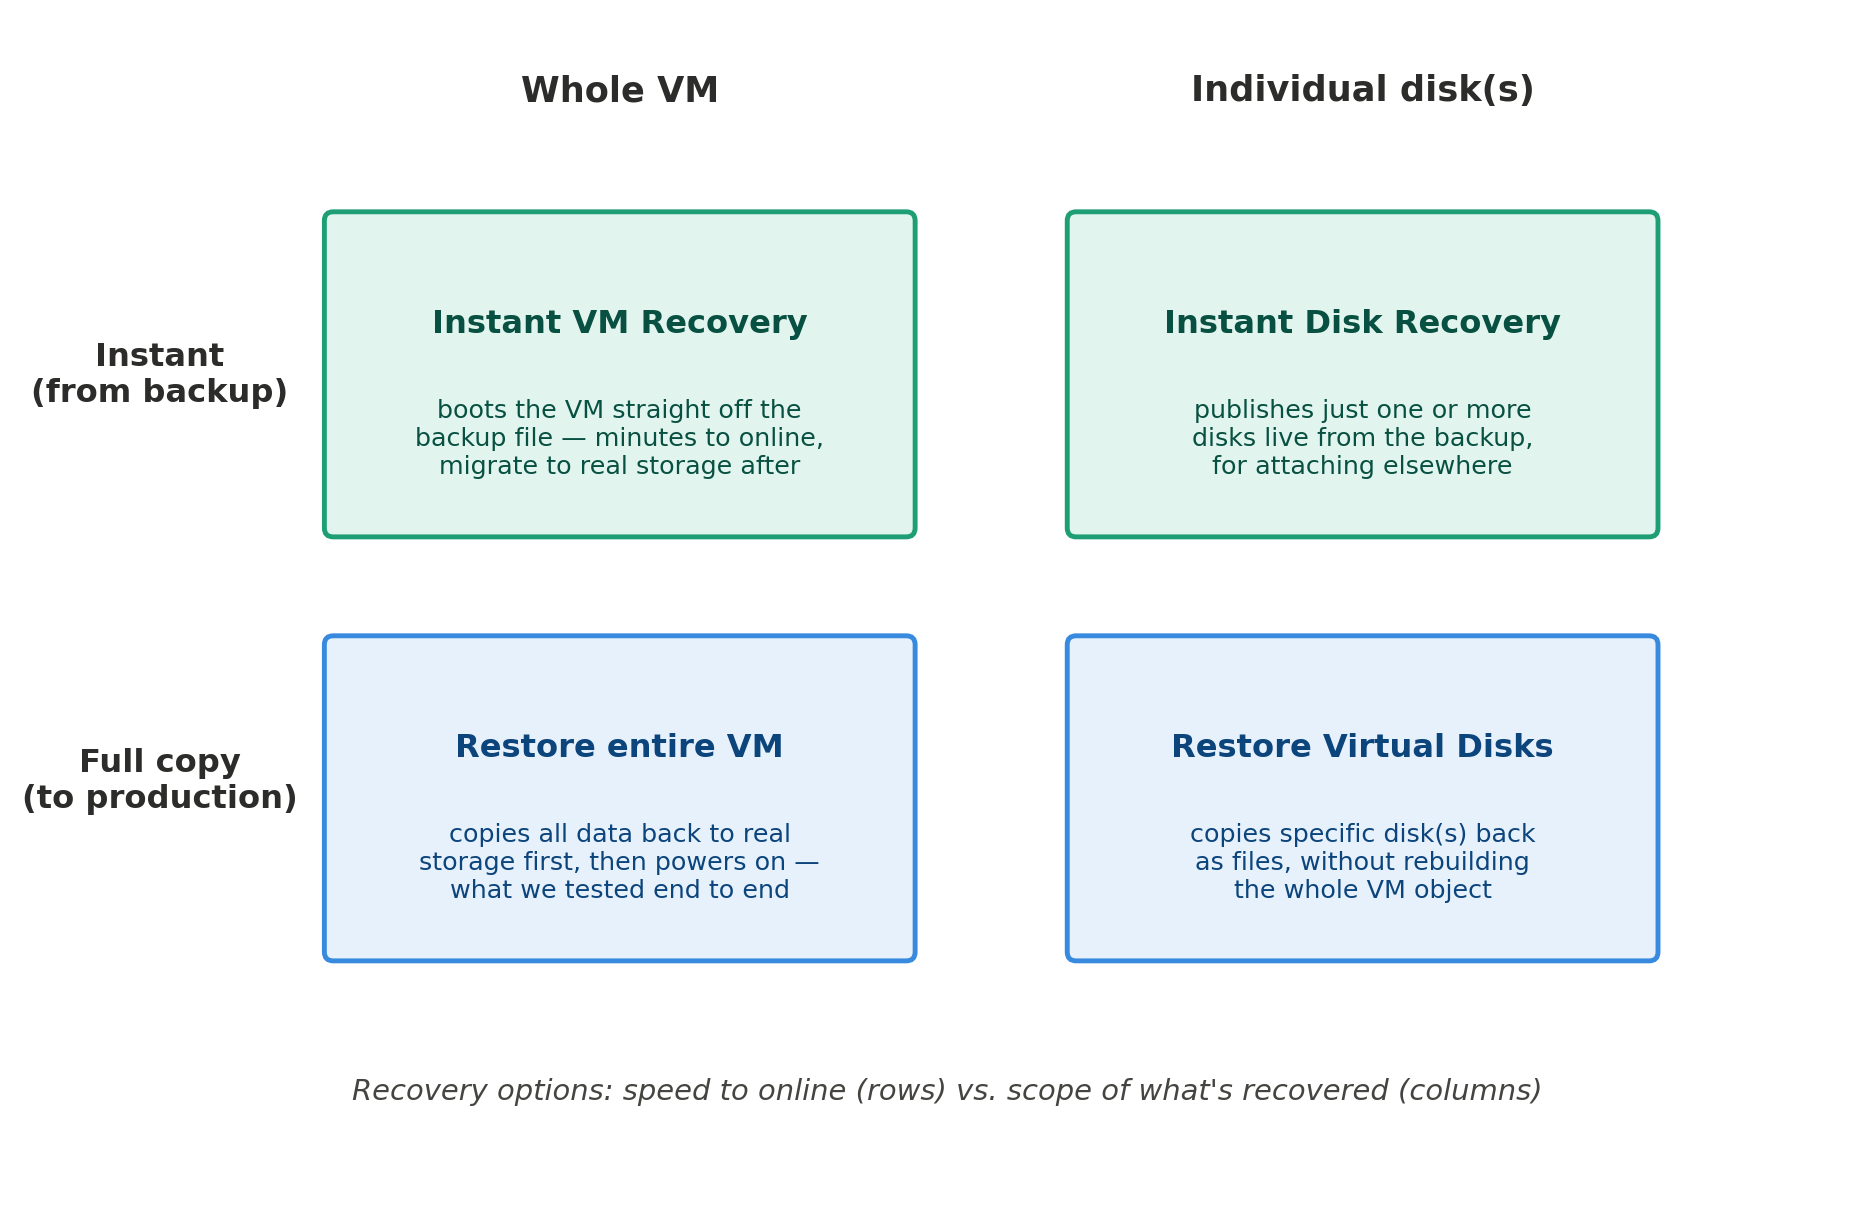
The four recovery options — speed to online vs. what’s actually recovered
- Instant VM Recovery boots the VM directly off the backup file — online in minutes, but running in a degraded state until you migrate it to real storage.
- Restore entire VM copies everything back to production storage first, slower to start but immediately independent of the repository once it’s done.
- Instant Disk Recovery and Restore Virtual Disks are the same tradeoff at the disk level, when you only need specific disks rather than a whole VM.
Proving It Actually Works
A backup that has never been restored is a guess, not a plan. I ran a full VM restore end to end — restoring to a new location rather than overwriting the original, which is the safer pattern for any first real test. That also meant disconnecting the virtual NIC before power-on, to avoid a network identity conflict with the still-running original.
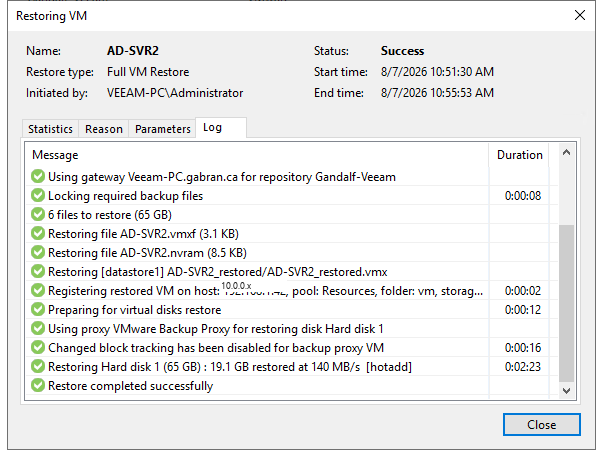
The actual restore log — 65 GB restored, completed successfully
That restore also exercised Secure Restore — before the restore was allowed to complete, Veeam mounted the backup’s disk and scanned it with an antivirus engine running on the Veeam server itself, not inside the guest, specifically to catch the scenario where the backup itself was already compromised before it gets put back into production.
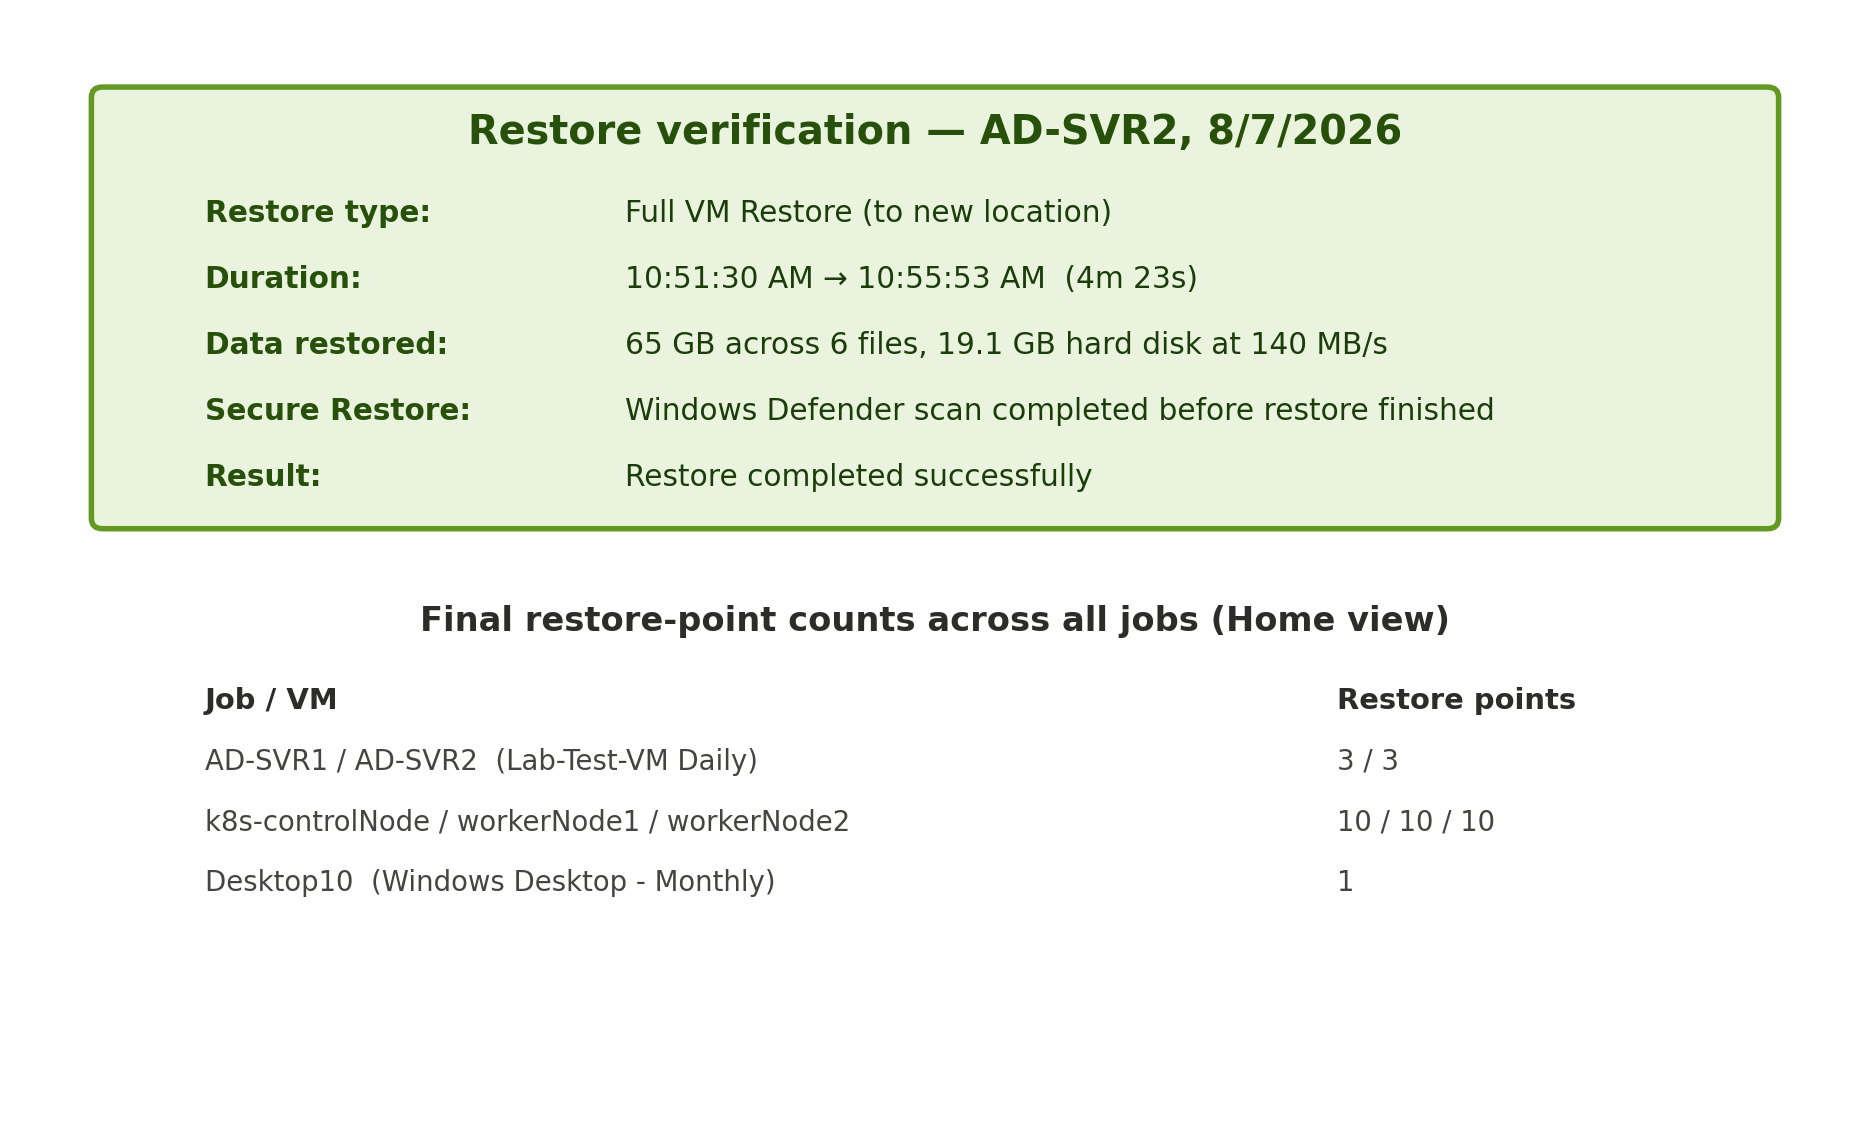
Confirmed results — a genuinely restorable backup, not just a completed job
Important: if you choose “Restore to the original location” instead, Veeam powers off and overwrites the original VM. That’s fine once you trust the process, but don’t make that your first restore test.
Storage Housekeeping — The Rule That Prevents Everything Else
Several separate cleanup questions I ran into all point at the same underlying principle: Veeam’s database is the source of truth, not the files on disk. The two should only ever change together, through the console.
- Deleting a job removes only its schedule/configuration — the backup files stay on the repository, listed as orphaned under Backups → Disk, until separately removed.
- Removing a VM from a job’s scope behaves the same way. I confirmed this directly: swapping a job’s scope from one VM to another left orphaned
.vbmstub files behind in that job’s folder. - “Remove from configuration” clears the database record only, leaving files behind. “Delete from disk” removes both together — that’s the one that actually reclaims space.
- If an object no longer appears in the console at all, even after a repository Rescan, the database has already forgotten it — and only then is it safe to manually delete the leftover file directly.
Never delete .vbk/.vib/.vbm files directly while Veeam still has an active database record of them. The next job run or restore attempt will fail against a broken chain instead of a clean “not found.”
Version Compatibility — The Wall I Actually Hit
This is the problem that took the longest to work through, and it’s worth walking through in full because it’s the kind of constraint that doesn’t show up until you’re already mid-deployment.
Adding my VMware host to Veeam initially failed outright with an API version error. The cause: the current major version of Veeam Backup & Replication dropped support for older vSphere releases — the minimum supported version is 7.0. My host is an HPE ProLiant DL380p Gen8 running an older ESXi build, and HPE’s official hardware compatibility for that model tops out exactly there. There’s no vendor-supported path to ESXi 7.0 on that hardware. (An unofficial community path exists — a generic VMware ISO plus a community driver add-on — but it’s unsupported by HPE and carries real risk to the storage controller and NICs.)
The decision: stay on the vendor-supported hypervisor version, and install the previous major Veeam release instead, since it still officially supports my ESXi version. That’s the version the rest of this lab runs on. One practical wrinkle: Veeam doesn’t publicly list superseded major versions on its download page — getting the installer required signing into the account and locating the version selector directly, since Veeam’s policy is not to publicly surface installers it no longer considers current.
The takeaway that generalizes past this specific lab: hypervisor and backup software version compatibility is a hard constraint, not a suggestion. Check it before installing, not after the first “Add Server” failure.
Licensing Options Beyond Community Edition
| Option | What it is |
|---|---|
| Community Edition | Free forever, same console as paid tiers, 10-workload cap, no vendor support — what this lab runs on |
| NFR license | Free for 1 year, up to 20 instances, requires a qualifying certification (VMCE, VCP, vExpert, etc.) |
| 30-day trial | Full Enterprise Plus feature set, unlimited instances, time-boxed — best for briefly testing advanced features |
One honest warning worth repeating: always get the installer through veeam.com directly, signed into your own account. Avoid third-party mirror sites offering “the same ISO” — there’s no good reason to take that risk for a file this size and this privileged.
Common First-Run Issues
- “Add Server” fails to connect to VMware — check that the Veeam VM can resolve and reach the vCenter/ESXi management address, and that the account has the right permissions. A VLAN ACL blocking TCP 443 is the most common lab-specific cause.
- Backup repository unreachable — confirm the share is reachable from the Veeam VM (try mapping it manually first), and that the account has write permission.
- Job stuck at “Creating snapshot” — usually a VMware Tools issue or an existing orphaned snapshot on the source VM.
- Installer stalls on SQL Express — make sure the VM has at least 8 GB RAM and isn’t running other heavy services during install.
- Console can’t reach the backup server — confirm the Veeam Backup Service is running, and that Windows Firewall allows TCP 9392 if the console and server ever end up on separate VMs.
Key Takeaways
- Community Edition and the paid tiers share one console. Everything learned here transfers directly if this lab ever moves to a licensed tier.
- A backup that has never been restored is a guess, not a plan. The actual proof point of this whole exercise was the restore completing successfully, not the backup jobs finishing.
- Retention and periodic full backups aren’t just about disk space. They directly bound both restore time and the blast radius of a single corrupted file.
- Treat the repository’s files as read-only from outside Veeam. The console is the only place that keeps the database and the files in sync — touching files directly breaks that.
- Hypervisor and backup software version compatibility is a hard constraint. Check it before you install, not after the first failure.
Where to Go Next
Within Community Edition’s limits, the natural next experiments are: a second job on a different schedule to practice managing multiple jobs, Instant VM Recovery to see a VM run directly from the backup file without a full restore first, a file-level restore instead of a full VM restore, and a backup copy job to a second location — a USB disk or second share — to actually practice the 3-2-1 rule instead of just knowing the acronym.
Appendix — Command Reference
# Find NFS exports on a Linux NAS
showmount -e
cat /etc/exports
exportfs -v

# Repository space usage, largest job first
du -h --max-depth=1 /home/veeam-backups | sort -rh
df -h /home

# Allow an NFS export under SELinux (Enforcing)
setsebool -P nfs_export_all_rw on
setsebool -P nfs_export_all_ro on
Appendix — Glossary
| Term | Meaning |
|---|---|
.vbk / .vib / .vbm |
Full backup / incremental backup / chain metadata — the three file types that make up a Veeam backup |
| Restore point | One recoverable moment in time within a backup chain |
| Forward-incremental chain | One full backup plus a growing string of incrementals, each depending on everything before it |
| Synthetic / active full | A new full backup built from existing files (synthetic) or re-read from source (active), used to bound chain length |
no_root_squash |
NFS export option letting a client’s root user write with full root privileges instead of being mapped to “nobody” |
| Instant VM Recovery | Booting a VM directly from its backup file for near-immediate recovery, ahead of migrating it to real storage |
| Secure Restore | Antivirus scan of a backup’s mounted disk, run before a restore is allowed to complete |