 Innocent.E
 I’ve spent the last few weeks doing what I always do when I want to actually understand a technology instead of just nodding along in meetings about it: I broke it on purpose, on my own hardware, until it made sense. This time the target was Kubernetes.
This post walks through that journey — the core concepts, how I set up a lab environment from scratch, and three progressively harder labs that took me from “what’s a Pod?” to running a real multi-node cluster with persistent storage, Ingress, and network policies. If you’re starting from zero, this should give you both the mental model and a practical path to follow.
Jump straight to a lab: Lab 1 — Foundations · Lab 2 — Storage, Ingress & Network Policies · Lab 3 — Real kubeadm Cluster
What Even Is Kubernetes?
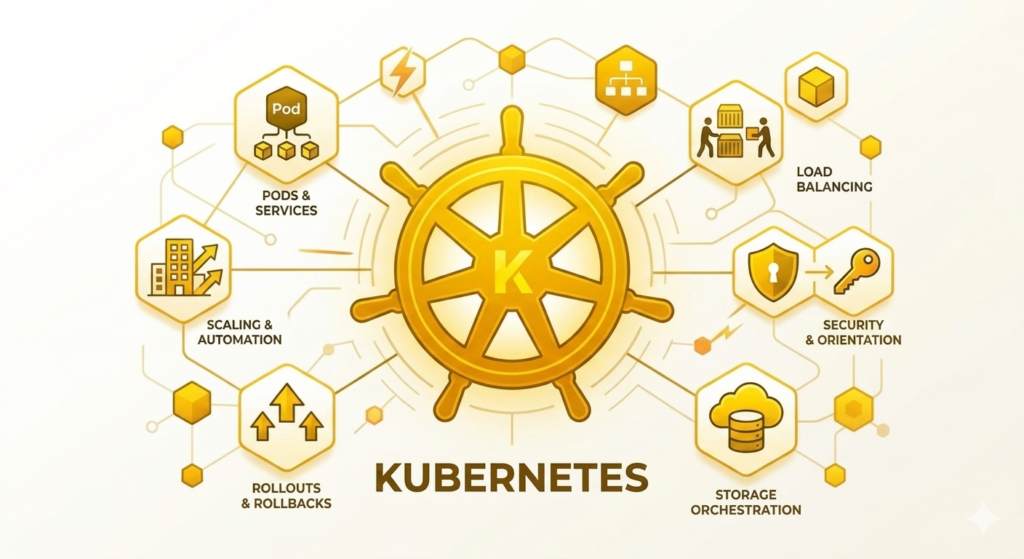
At its core, Kubernetes is a system for running containers reliably across a group of machines. You describe what you want (“I want 2 copies of this WordPress container running”) and Kubernetes continuously works to make reality match that description — restarting failed containers, rescheduling them onto healthy machines, and scaling them up or down.
A few ideas make everything else click:
- Declarative, not imperative. You don’t tell Kubernetes how to run your app step by step — you write a YAML file describing the desired end state, and the control plane figures out how to get there and keep it there.
- Everything is an object. Pods, Services, Secrets, Deployments — they’re all just objects stored in Kubernetes’ database (
etcd) and reconciled continuously by controllers. - Self-healing by default. Kill a Pod, and if it’s managed by a Deployment, a replacement appears automatically. This is the whole point.
The building blocks I used constantly across all three labs:
| Component | Purpose |
|---|---|
| Pod | The smallest deployable unit — one or more containers sharing storage and network |
| Deployment | Manages a Pod’s lifecycle: desired replica count, rolling updates, self-healing |
| ReplicaSet | The thing a Deployment creates behind the scenes to actually keep N Pods running |
| StatefulSet | Like a Deployment, but for apps that need a stable identity — databases, mainly |
| Service | A stable network address that load-balances across a set of Pods |
| Secret | Stores sensitive values (passwords, keys) separately from your app config |
| Namespace | Logical isolation — keeps one project’s objects separate from another’s |
Setting Up a Kubernetes Lab as a Beginner
You don’t need a data center to learn Kubernetes — you need a laptop and about twenty minutes. Here’s the progression I’d actually recommend, because it’s the one I used myself:
- Start with a local, disposable cluster. KIND (Kubernetes IN Docker) runs an entire Kubernetes cluster as Docker containers on your existing machine. No VMs, no cloud bill, and you can create and destroy a cluster in under a minute. This is where every one of my labs started.
- Learn to switch contexts before you touch anything else. My workstation already had Docker Desktop’s built-in single-node cluster running (context
docker-desktop). The moment I created a KIND cluster alongside it, I had two clusters on one laptop. I never deployed anything to Docker Desktop’s cluster — I used it purely as the “other” cluster to practicekubectl config get-contextsandkubectl config use-contexton, so I couldn’t accidentally deploy things to the wrong place once real labs started. That habit paid off later. - Graduate to a real multi-node cluster with kubeadm. Once the concepts click on KIND, the next real step is
kubeadm— the tool that bootstraps an actual production-style cluster across real (or virtual) machines. I ran mine across three Ubuntu VMs: one control-plane node and two workers. - Add a GUI once the CLI stops being scary. I used Headlamp as a visual dashboard alongside
kubectl— it’s genuinely useful for seeing pod placement, resource usage, and object relationships once you already understand what you’re looking at from the command line. I’d resist reaching for a GUI before that, though — the CLI output teaches you the object model in a way a dashboard glosses over.
KIND vs kubeadm
This tripped me up initially, so here’s the plain breakdown between the two clusters I actually built and deployed workloads to:
| KIND | kubeadm | |
|---|---|---|
| What it actually is | A real Kubernetes cluster, running as Docker containers | A tool that installs and joins real Kubernetes nodes (VMs or bare metal) |
| Best for | Fast, disposable labs and CI pipelines | Learning what a real cluster looks like — multi-node, real networking, real disks |
| Node count | Simulated multi-node (containers pretending to be nodes) | Genuinely separate machines |
| Storage | Paths live inside a Docker container | Real directories on a real VM’s disk |
| Networking gotchas | Port mapping is a config file setting | Port mapping means NodePort on a real IP; no cloud load balancer |
| Teardown | kind delete cluster — gone in seconds |
You tear down your objects, not the cluster itself |
The honest recommendation: start on KIND because the feedback loop is fast and mistakes are free. Move to kubeadm once you want to feel what “no cloud load balancer, no magic port mapping, real disks” actually means — because that’s what you’ll hit in a real datacenter or a bare-metal environment.
Networking and Storage Terms Worth Knowing Before You Start
A short glossary that would have saved me some head-scratching:
Networking
- Pod network — every Pod gets its own IP address from this range. Pods can talk to each other directly across this network.
- Service network — a separate IP range used only by Services, which are stable “front doors” in front of a changing set of Pod IPs.
- ClusterIP — the default Service type. Only reachable from inside the cluster.
- NodePort — opens a high port (30000–32767) on every node’s real IP, so traffic can enter from outside the cluster without a load balancer.
- Ingress — a smarter front door that routes traffic by hostname/path to the right Service, sitting behind a single entry point (the Ingress controller). This is what NodePort should graduate into once you have more than one app.
- Kubernetes DNS — every Service automatically gets a DNS name. A Pod can reach MariaDB by name (
mariadb-service) instead of hunting down an IP address that changes every time the Pod restarts. This is the single most important networking idea in the whole system. - NetworkPolicy — a firewall rule object that restricts which Pods can talk to which. Important gotcha I hit directly: NetworkPolicy objects do nothing by default. They only take effect if your cluster’s CNI plugin (the networking layer) actually enforces them. Flannel — a very common, simple CNI — does not. Calico and Cilium do. You can apply a “deny all” policy on Flannel and traffic will flow right through it, which is exactly what happened in my kubeadm lab and is a genuinely useful thing to learn the hard way once.
Storage
- emptyDir — a scratch directory tied to a Pod’s lifecycle. It exists while the Pod exists and vanishes the moment the Pod is deleted — not just restarted, deleted. Good for caches and temp files, useless for anything you want to keep.
- PersistentVolume (PV) — a piece of real storage capacity registered with the cluster (in my labs, a directory on a node’s actual disk).
- PersistentVolumeClaim (PVC) — an application’s request for a chunk of that storage. Think of the PV as a shelf and the PVC as a reservation ticket for space on it.
- StatefulSet — pairs naturally with persistent storage because each replica gets its own stable name (
mariadb-statefulset-0) and its own PVC that follows it across restarts. This is why databases run as StatefulSets and not plain Deployments.
Lab 1: The Foundations — WordPress and MariaDB on KIND
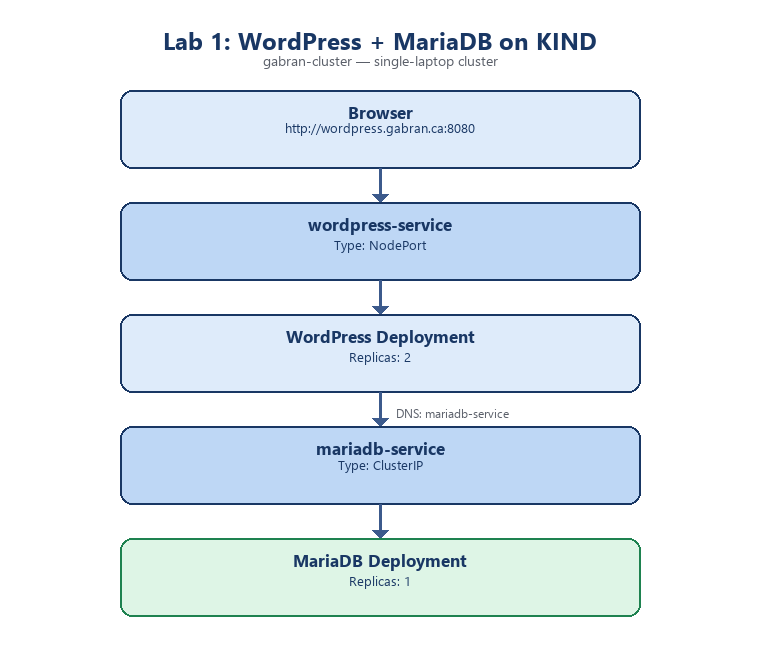
Lab 1 architecture: Browser to WordPress Deployment to MariaDB, all inside the KIND cluster
My first cluster was a KIND cluster named gabran-cluster, coexisting with the Docker Desktop cluster already on my laptop. The goal was deliberately simple: get a WordPress site talking to a MariaDB database, entirely inside Kubernetes, and understand every piece involved.
The shape of it:
Browser → wordpress-service (NodePort)
              ↓
     WordPress Deployment (2 replicas)
              ↓  DNS: mariadb-service
     mariadb-service (ClusterIP)
              ↓
     MariaDB Deployment (1 replica)
The build order mattered: create the namespace, create a Secret holding the database credentials, deploy MariaDB, then deploy WordPress pointed at MariaDB by DNS name, not IP address:
env:
- name: WORDPRESS_DB_HOST
  value: mariadb-service
- name: WORDPRESS_DB_PASSWORD
  valueFrom:
    secretKeyRef:
      name: mariadb-secret
      key: password
That one line — value: mariadb-service instead of a hardcoded IP — is the whole point of Kubernetes DNS. Pods get replaced and get new IPs constantly; the Service name never changes. I proved this to myself by spinning up a throwaway BusyBox Pod and running nslookup mariadb-service from inside the cluster, watching it resolve to the Service’s stable IP.
I also deliberately scaled WordPress up and down (kubectl scale deployment wordpress-deployment --replicas=3, then back to 2) just to watch the ReplicaSet controller add and remove Pods in real time — a good way to internalize what “desired state” actually means in practice.
Lab 2: Going Advanced on KIND — Storage, Ingress, and Network Policies
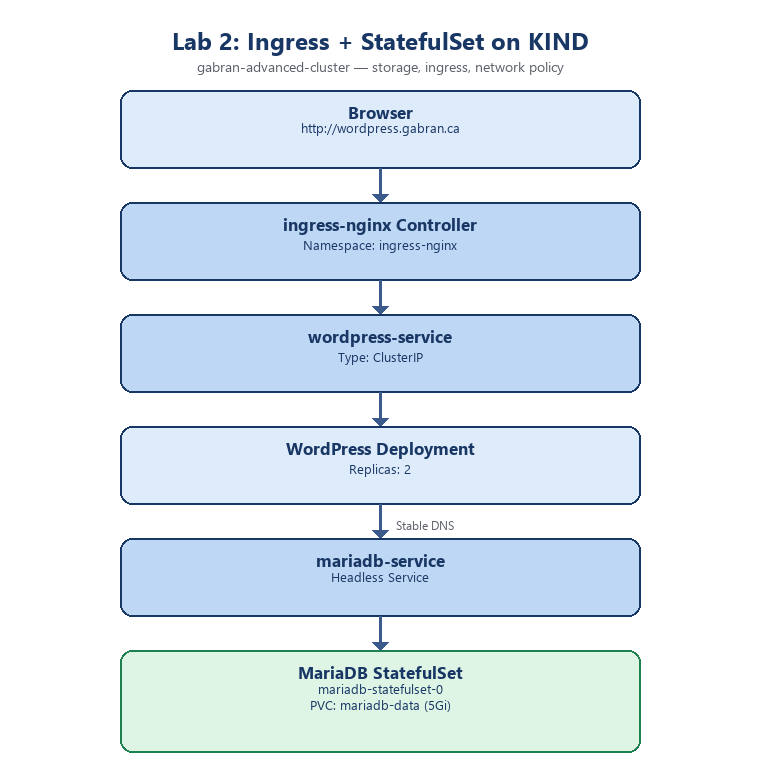
Lab 2 architecture: Ingress in front of WordPress, MariaDB running as a StatefulSet with a PVC
With the fundamentals solid, the second lab took the same WordPress/MariaDB idea and rebuilt it with patterns you’d actually see in a real environment.
Proving storage behavior, not just reading about it. I created a Pod with an emptyDir volume, wrote a file into it, deleted the Pod, and recreated it — the file was gone, exactly as expected, because emptyDir dies with the Pod. Then I did the same experiment with a Pod using a PersistentVolumeClaim backed by a real directory — the file survived. Seeing both outcomes side by side, rather than just reading the definitions, is what actually made the PV/PVC distinction stick.
MariaDB moved to a StatefulSet. Instead of a plain Deployment, MariaDB got:
apiVersion: apps/v1
kind: StatefulSet
metadata:
  name: mariadb-statefulset
spec:
  serviceName: mariadb-service
  volumeClaimTemplates:
  - metadata:
      name: mariadb-data
    spec:
      accessModes: ["ReadWriteOnce"]
      resources:
        requests:
          storage: 5Gi
This gets you a predictably-named Pod (mariadb-statefulset-0) and a PVC that’s automatically created and reattached to that same Pod identity every time it restarts — precisely what you want for a database.
WordPress moved behind Ingress instead of NodePort. Installing ingress-nginx and creating an Ingress rule for wordpress.gabran.ca meant WordPress’s own Service could go back to being a plain internal ClusterIP — the Ingress controller became the single, smarter front door instead of exposing a raw port directly.
Network Policies, and the lesson about CNI enforcement. I applied a default-deny policy, then explicit allow rules for WordPress → MariaDB and Ingress → WordPress traffic. On KIND’s default networking, this is purely an exercise in writing correct policy YAML — worth doing for the syntax and mental model, even knowing enforcement depends on the CNI underneath.
Lab 3: From Laptop to Real Cluster — kubeadm
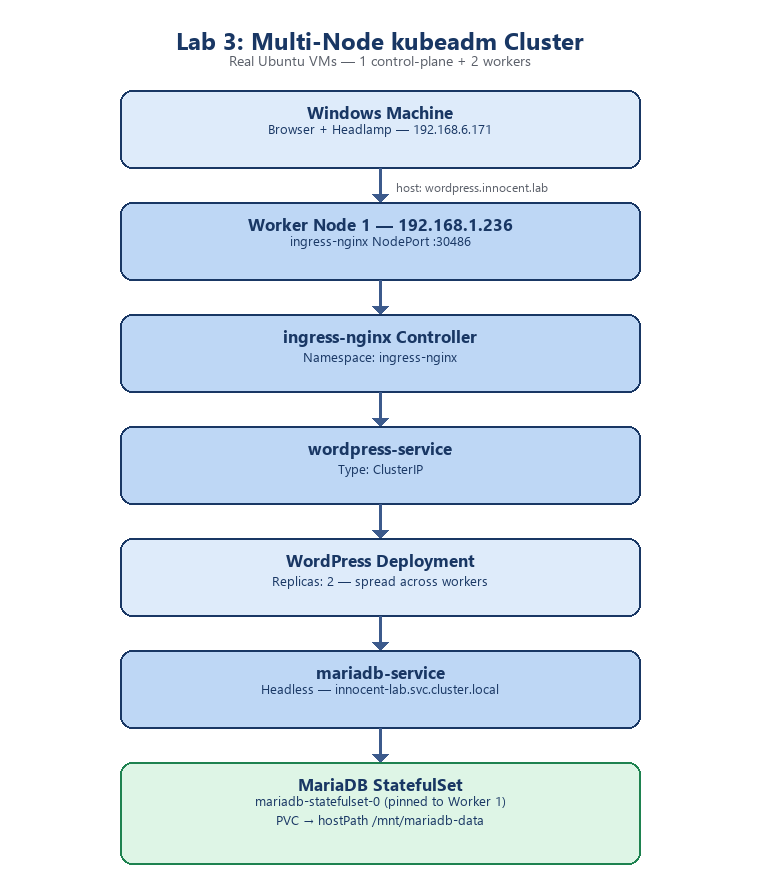
Lab 3 architecture: the same shape, now spread across real worker nodes with a real disk behind MariaDB
This is where the lab stopped being a simulation. I rebuilt the same advanced lab — ephemeral storage, persistent storage, StatefulSet, Ingress, network policies, monitoring — on a genuine three-node cluster built with kubeadm: one control-plane node and two workers, all real Ubuntu machines.
The differences from KIND were the entire point of doing this:
| Area | KIND | kubeadm (real cluster) |
|---|---|---|
| Creating storage paths | docker exec into a container |
SSH into the actual worker VM and mkdir on its real disk |
| Exposing port 80 | A config file setting (extraPortMappings) |
NodePort on a worker node’s real IP — no cloud load balancer exists |
| Ingress manifest | KIND-specific deploy file | The bare-metal deploy file — a genuinely different YAML |
| hosts file entry | 127.0.0.1 |
The actual IP of worker node 1 |
A couple of concrete moments from this lab that stuck with me:
Finding the real NodePort. The bare-metal Ingress installer assigns a random high port for HTTP — you have to go find it:

Finding the real NodePort assigned to the ingress-nginx controller on the kubeadm cluster
Reaching WordPress through a real multi-node path. Browser → NodePort on a worker’s real IP → Ingress controller → Service → Pod, across actual separate machines:
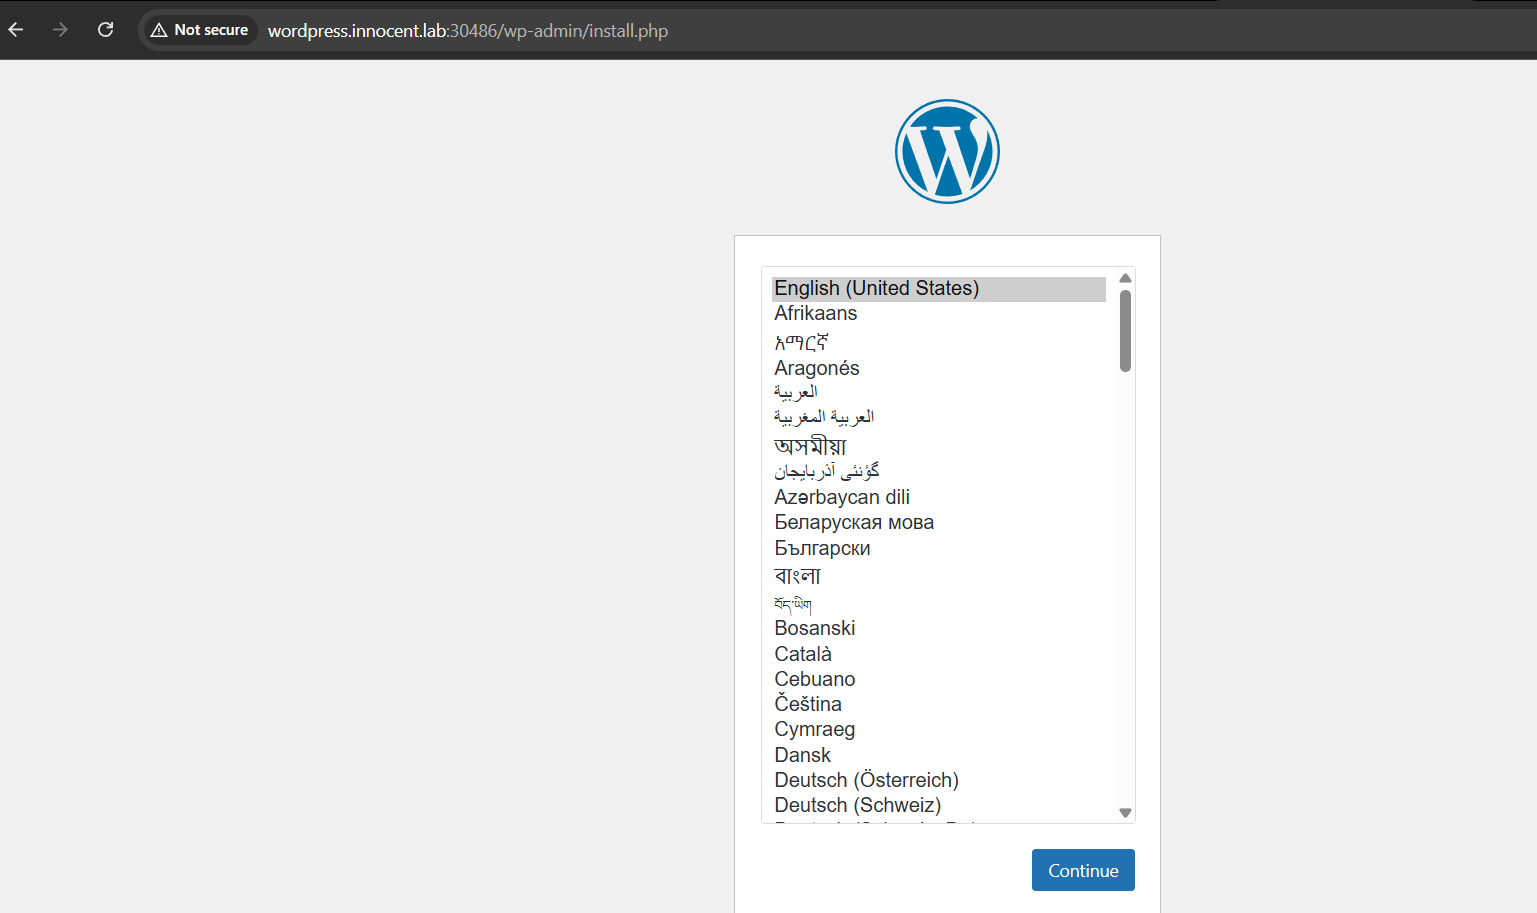
WordPress reachable through the real multi-node path: browser to NodePort to Ingress to Service to Pod
Metrics Server needed a patch it didn’t need on KIND. kubectl top requires the Metrics Server, and on a real kubeadm cluster it has to be told to trust the kubelet’s self-signed certificate (--kubelet-insecure-tls) — one of those small, real-world details that never comes up in a fully simulated environment.
Flannel’s NetworkPolicy gap, confirmed for real this time. Same experiment as the KIND lab — default-deny, then a test Pod still reaching WordPress anyway — except this time it’s a genuine confirmation that Flannel (my CNI here) doesn’t enforce these objects, not just a theoretical caveat. The fix, if I wanted enforcement, would be replacing Flannel with Calico or Cilium — a good next lab.
What This Whole Journey Actually Taught Me
A few things were worth more than any single command:
- Kubernetes DNS is the feature that makes microservices tolerable. Once you stop hardcoding IPs and start trusting Service names, entire categories of “why did this break” disappear.
- The gap between “it works on my laptop” and “it works on real infrastructure” is smaller than I expected, but not zero. Storage paths, port exposure, and Ingress manifests all needed real changes moving from KIND to kubeadm — good practice for the same jump you’d make going from a local cluster to a cloud one.
- Reading about NetworkPolicy and watching it silently do nothing are two different lessons. The second one actually teaches you to check your CNI before you trust your firewall rules.
- StatefulSets earn their complexity. Once you’ve watched a plain Deployment lose a database’s identity on restart, and then watched a StatefulSet not do that, the extra YAML stops feeling unnecessary.
What’s Next
I used Headlamp throughout the kubeadm lab as a visual companion to kubectl — it’s worth its own post once I’ve put it through more paces. The other obvious next step is swapping Flannel for Calico specifically to watch those same NetworkPolicy objects actually start blocking traffic — closing the loop on the one gap this whole journey kept surfacing.
Beyond that, the natural progression from “I built a real cluster on my own hardware” is “I build one I don’t have to rack, power, or patch myself.” That means taking this same WordPress/MariaDB shape and deploying it to a managed cloud Kubernetes service — Amazon EKS or Azure AKS — and seeing what the platform hands you for free that I had to build by hand here: a real cloud load balancer instead of NodePort, managed persistent storage instead of hostPath on a VM’s disk, and IAM-integrated access control instead of local kubeconfig files. That comparison — what changes and what stays exactly the same — feels like the right next lab.
Now It’s Your Turn
If you’ve been putting off building your own Kubernetes lab, this is your sign to stop putting it off — KIND alone will get you a working cluster in under twenty minutes. And if you’ve already got a Kubernetes project of your own, whether it’s a single-node experiment or a full multi-node build, I’d genuinely like to hear about it. What tripped you up? What finally made a concept click for you? Drop a comment below or reach out directly — I read everything, and I’ll probably write about the questions that come up.